3D Design Challenge

HomeOur Senior Learning Community students have utilised their Maths & Technology skills & knowledge to create some amazing 3D structures.

Using the SketchUp 3D modelling program, students learnt how to construct basic 3D shapes and then combined them all for their final design.

Exercising their design & creative thinking skills throughout the process, students finished off their creations by adding colour and texture to make realistic structures.

Print Friendly, PDF & Email

Monitoring the Environment with Digital Technology

School NRM Environment Grant

In 2018-2019, our school received an NRM Environment Grant for the purchase of digital equipment and nesting boxes.  This project has enabled our students to engage more closely with the Hahndorf Creek & surrounding environment by using this equipment to collect evidence of existing plants & wildlife and to monitor environmental changes that are related to our larger Creek restoration project.

We would like to share some photos and videos from this project.

Smartphone Microscope Converters

These $5 converters attach to our iPads and allow us to take photos and videos with up to 30x magnification.

Check out our amazing galleries of photos and videos.


Make sure you have the sound turned up for the videos to hear the excitement of discovery in our voices.


Motion Sensing Camera

This Swift Enduro motion sensing camera has been set up in the school grounds and along the creek to take photos and videos whenever it detects movement OR at certain time intervals (timelapse mode).

Some of our SLC students learnt how to set up and install the camera and have discovered that it takes patience and perseverance to get good footage!!  Below are some photos and video, including a timelapse video of our tree planting day.


Nesting Boxes

We purchased 3 medium parrot nesting boxes and a brushtail possum box.  These arrived in flat packs and some of our SLC students put them together and painted them with timber oil.  They are now waiting to be installed on trees along our creek and in our school grounds.

Once our nest boxes are installed we are looking forward to using our nest box camera to monitor the comings and goings of wildlife to the boxes.

STAY TUNED for more photos and video in the months ahead


Print Friendly, PDF & Email

Technology Club

Technology Club is a place where upper primary students can gather at lunch time to explore coding, robotics and all things techy.

During Term 2, some students were busy designing and coding animations and games on their iPads, while other students were challenged to construct a powered vehicle that could carry a soft toy passenger. The vehicle was powered by one or more robotic sphero balls and involved skills and knowledge in design, engineering, maths, science and technology.

Please have a look at our short video to see what fun our students had while they were experimenting and problem solving with their friends.


Print Friendly, PDF & Email

iPads in the Classroom

Last term we purchased 15 iPads for shared use among our classes. These new devices were received with great excitement from students and staff alike, and I thought that now might be a good time to reflect on our experiences to date.

Why iPads?

With many different tablet and mobile devices on the market, we carefully reviewed other options before selecting the iPads. Although most options would have met many of the following criteria, the iPads were the most suitable device across the board.

  • They start up instantaneously and are ready to use immediately. No network login is required.
  • Their touch interface, large screen size and portability make them very easy for the students to handle and use.
  • They allow quick and easy access to information, multimedia and learning activities.
  • They enable access to a whole new market of educational ‘apps’ through the Apple App store – many of which are free.
  • They are great for taking photos and videos and recording audio.

We chose to purchase the iPad 2 16GB Wi-fi model. These were purchased on special as the supplier was clearing this model out to make way for the ‘new iPad’. We didn’t see any major benefit in purchasing the ‘new iPad’ at this stage and so were content with the iPad 2, especially at the discounted price. We also chose the base model (16GB) over the 32Gb or 64Gb model and didn’t worry about the 3G functionality as they will primarily be connected to the school Wi-Fi network.

Challenges

Some of the challenges that we faced in the initial setup and ongoing use of the iPads were as follows.

  • iPads were designed as a personal, single-user device and we needed to use them in a shared environment. Where students needed to save and share work, we needed clear, simple procedures for doing this.
  • Apple had no volume licencing program for iTunes purchases in Australia. To comply with the App Store terms and conditions we had to set up an iTunes account for each iPad and ensure that we purchased apps legally.
  • With so many apps on the market, we needed to decide which ones to load on the iPads up front and how to manage requests from teachers for new apps. Several apps were free, but for purchased apps we needed to set a $limit per iPad and manage how to decide which apps to purchase.
  • We needed to set up and manage the iPads effectively and efficiently, ensuring that the setup was identical on each one.
  • We needed to set up procedures for storing, carrying, charging, backing up, updating, upgrading and maintaining the iPads.

This involved a lot of up-front effort, but once set up the on-going maintenance of the iPads has been quite straight forward. Given the small number of iPads, we manage them individually over the school Wi-Fi network and have not invested in any multiple device configuration or synchronisation software at this stage.

iPad Setup

We bundled the 15 iPads into 3 sets of 5 and purchased sturdy carry bags for transporting them around the school. Each set was colour coded and we designed and installed a unique wallpaper on each iPad which had a background colour to match the set colour, the school logo and the iPad number. The apps were installed identically on each iPad and spanned 3 home screens. Several of the default settings were changed, including the following.

  • General > About > Name : Each iPad was given a unique name from smlpsipad01 to smlpsipad15.
  • General > Auto Lock : We increased this to 15 minutes so that the screens wouldn’t go into lock mode too quickly during lessons.
  • General > iPad Cover Lock/Unlock : We turned this off to prevent the iPad going into lock mode when the cover was ‘flapping’.
  • General > Restrictions : We turned restrictions ON and DISABLED access to YouTube, FaceTime, iTunes, Ping, Installing Apps, Deleting Apps, In-App Purchases and the Game Center. We configured the settings in the ‘Allowed Content’ section appropriate to primary school aged children.
  • Mail, Contacts, Calendars : We set up a unique gmail account for each iPad using gmail’s plus addressing syntax (ie smlpsipad+01@gmail.com). We then changed the e-mail signature to “Sent from smlpsipad01” etc. This allows students to send documents they have created on the iPad to their teacher and the teacher can identify the exact iPad from which the e-mail was sent.

Apps

A full list of apps that we installed is in our document titled ‘Student iPad Setup’. A few that have been put to good use at this stage include.

Book Creator
by Dan Amos
A simple iBook creator. Add photos, videos, music, voiceovers, text, colourful backgrounds etc. Read your creations in the iBook reader or share as an iBook or pdf file.

Several junior primary classes have used this app to create iBooks and pdf documents. The Year 1 classes created narrated iBooks for their Unit of Inquiry on story writing.

Google Earth
by Google Inc
A virtual globe, map and geographical information app. Explore global satellite and aerial imagery, geo-located photos and Wikipedia articles etc.

The Year 3 classes used Google Earth to explore natural and built structures around the world and the Year 4 classes used it to explore Asia.
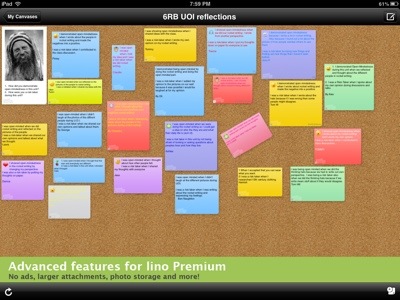
lino
by Infoteria Corporation
On-line sticky note app. Post, see and peel off stickies on on-line collaborative canvases, which are also accessible from PC browsers. Stickies can contain text, images and videos.

Several classes have created collaborative canvases using this app on the iPads or on the lino website from the schools PC’s.

20121010-200507.jpg

Camera
by Apple
The built-in camera app takes still photos and video and saves to them the Camera Roll in the Photo app.

Most year levels have enjoyed using the iPads as another method of taking photos and videos to use in documents, presentations, video clips and movies.


Our reception classes have enjoyed using the following literacy and numeracy apps …

rED Writing
by Rogue Mobile
An app for teaching children how to write letters and numbers using Australian education approved font. Co-designed by an Australian teacher for children aged 3-7 years old.

abc PocketPhonics
by Apps in My Pocket Ltd
An app for teaching the basics of reading and writing to young kids (aged 3 to 6). Letter sounds, handwriting, first words.


FriendsOfTen

by Aleesha Kondys
An app for use in early schooling years to introduce an understanding of numbers to ten, counting objects, subitising, counting on from a higher number, partitioning of objects and combinations that make ten.

Subitising Flash Cards
by Aleesha Kondys
An app for testing subitising knowledge by recognising small groups of objects without counting.


Print Friendly, PDF & Email

ICT and the Year 7 PYP Exhibition

The central idea behind this year’s PYP Exhibition was

There are major events in history which have impacted on the world and its people.

Our year 7 students researched, prepared and showcased their learning about a significant historical event.  ICT played a large part in all of these stages and along with traditional display materials such as books, posters, artifacts and models, digital technology was used extensively during the exhibition performance and showcase.  Here are just some of the ways in which ICT was used during the Exhibition process.

Printing information and photos for displays

Nicholas displays photos and information about the bombing of Hiroshima and Nagasaki

Creating an Exhibition Newspaper

A 4 page exhibition newspaper was created in Microsoft Publisher and printed on beige A3 paper to give the old looking effect.

Chloe made a crossword for the back page of the newspaper using a crossword making website.

Visitors enjoyed reading the newspaper which contained an article about each of the historical events that were presented at the Exhibition.

Displaying Prezis on the Student’s Tablets

(see previous post Presenting Prezi)

Alicia and Isabel presented their Prezis using a data projector

Macca created a Prezi about Hiroshima and Nagasaki

Campbell created a Prezi about Charles Kingsford Smith

 Playing Video and Audio Recordings

Younger students watched videos relating to the exhibits

Olivia displayed information and played an audio recording of Kevin Rudd’s Sorry Day Speech

Kane narrated the events of the Cuban Missile Crisis with images in the background

Sam used his iPod to play an audio recording about World War II

 Background Music and Video for the Exhibition Performance

Campbell created an amazing video clip to accompany the entire exhibition performance. It contained backing music, video clips, images, sound effects and strategically placed silences.


Print Friendly, PDF & Email

Flip Cameras

With more and more ICT activities in our school requiring the use of video cameras, we have purchased 4 flip mino video cameras for use across the school.  It is hoped that through these child-friendly video cameras we can promote a more independant environment for students to experiment with technology to further their ICT skills and to enhance their learning and creativity.

Some of the features of these cameras that make them appealling for use in a primary school include :

  • They are very small yet robust, weighing only 4.1 ounces
  • They have a simple design, consisting of only 7 buttons
  • They contatin a flip-out USB arm that plugs directly into a computer to download files.  This means that there are no separate cables to lose and no additional software.
  • The built-in memory last for up to 60 minutes of high-quality video
  • They are capable of 2x digital zoom 
  • They have a silent mode for recording in sensitive situations
  • They have a TV connector cable included to watch videos on television
  • They have a tripod mount that fits any standard tripod
  • They record vdeo in .MP4 Format which is compatible with Windows Live Movie Maker

These cameras can be used in the following situations

  • Recording video for ICT projects such as the Year 5/6 advertisements ,Year6/7 advertisements and the year 3 force videos
  • Recording performances, presentations, assemblies, excursions and guest speakers
  • Recording interviews
  • Recording and analysing group work
  • Recording data in science projects, experiments or long-term monitoring of an outdoor location
  • Recording responses to books, projects, lessons and units
For some great examples of using Flip Cameras in the classroom, including uses for maths, science, PE, drama, behaviour analysis, excursions, debating, collaboration, language, school events, school promotions, training and so on  take a look at the Free Technology For Teachers blog.
Print Friendly, PDF & Email

Solarschools website

Today Mrs Fudali’s year 5 class had fun exploring the solarschools website.  This site contains live data that is downloaded every half hour from our school’s PV system.   (See my post titled Solar Energy Monitoring).

Solar panels

Firstly the class ventured out into the sunshine to search for and look at the solar panels on top of the year 1/2 building.  We counted the number of panels and the factors that affect the amount of electricity that is generated each day.  We then went to the computer room, where the students accessed the website and searched for answers to the questions on this Solarschools worksheet that I prepared for them.

Print Friendly, PDF & Email

Microsoft Partners in Learning Seminar

On Tuesday 17th May, John & I attended the “School Leaders Building Skills for Tomorrow” event, which was run by Microsoft.  This event delivered an overview of the integration of Electronic Technologies and use of Information Technology in the classroom.  The 3 hour event included

We left the seminar with many resources, including a booklet titled ‘Bringing a 1-to-1 program to life’ which is a handbook for primary school teachers considering a 1-to-1 student-to-laptop program in their school.

Print Friendly, PDF & Email

HP Tablet PC

As part of  the Microsoft Peer Coaching Program that I was recently involved in I was lent a HP Tablet PC to use for a period of up to 6 months.  This offers a great opportunity for me to show our staff some emerging technology and how it can be used to enhance teaching and learning in our school.

HP EliteBook 2740p Tablet PC - Business Laptop and Tablet PCs

Firstly, click here to take a look at a video from HP to learn a bit about the Tablet PC.

The features of a Tablet PC that I see being useful to teachers and students include :

  1. Pen or finger touch to navigate applications.
  2. Pen to highlight text and write notes in margins and the facility to convert handwriting to text.
  3. Pen, audio and video in applications such as MS Word and MS OneNote to mark student’s work.
  4. Pen for creative and artistic applications.
  5. ebooks featuring images, video and audio.
  6. A thin, lightweight alternative to many laptops or netbooks.
  7. Integration with cloud-based systems to help make teaching and learning more synchronised.
  8. Touch screen technology which is similiar to iPads, iPods, mobile phones and other technology that teachers and students use.

In his article 6 Reasons Tablets Are Ready for the Classroom, Vineet Madan from McGraw-Hill Higer Education eLabs discusses how iPads and other Tablet PCs have been adopted by educators in classrooms.

Please feel free to have a look at this Tablet PC and discuss ways that it could be of value to you and your students.

Print Friendly, PDF & Email

New webcams

logitech-hd-webcam-c510

Our school has recently purchased three Logitech C510 HD Webcams.  Click here for technical details about these units.

These webcams easily clip onto a computer monitor and can be tilted and rotated as required.  They can also be laid flat on a table or clipped to other objects within cable reach of the computer.  Possible uses for these cameras within the school include

  1. Video conferencing with Skype
  2. Taking pictures with the Logitech Webcam Software
  3. Recording video with the Logitech Webcam Software

Using a webcam is a great way to make clay animation or other stop motion animation videos because the webcam can be carefully positioned on a table top and controlled from the computer, making it easier for children to operate it without moving the camera.

They could also be very useful for teachers to instruct or talk to their students by making video clips while sitting comfortably at their computer.

If anyone would like to start using these webcams, especially for video-conferencing, please let me know as I am keen to start using these valuable devices.

Print Friendly, PDF & Email